Refurbishing the '33/'34 Sports and Le Mans Springs
It’s amazing how involved even something as simple as restoring leaf springs on your Singer Nine can be, but let’s start with the obvious (starting with taking a few digital shots).
 Remove the bushings, dismantle the springs and examine for wear. This may dictate whether you want to continue. Generally you’ll find they’re in restorable condition, although one of my Nines had a couple of leafs that had worn to the point they looked like knife blades. Also take a look at the retaining clamps. You may need to peen the rivets that secure them to the leaf to tighten them up.
Clean the crud and scale off each leaf. The stiff wire brush on a grinding machine works pretty well and does a reasonably complete job. I would recommend this step even if you plan on having them glass beaded. I prefer glass beading to sand blasting, as it’s easier on the metal. It’s also much cleaner as it doesn’t leave grit in all the nooks and crannies.
Next prime each leaf with a good commercial rust proofing primer (not tremclad) and top coat with a compatible enamel. Let the topcoat cure for a week or so before any further work.
Prior to reassembling, rebush the main leaf. It’s easier to manipulate one leaf, rather than the whole assembled spring. The Silentbloc bushings are the same as the ones used in the frame, although I did find that the rear springs used a 7/8" outer diameter bushing, rather than the usual 15/16". I don't know if this was typical. Fortunately, I was able to get these at my local spring shop, although they needed to be cut to length.
Proceed with reassembly. I put mine together dry; that is, with no lubrication. The theory is that if lubricated, grit gets trapped and remains between the leaves hastening spring wear.
Replace all the spring retaining clamp bolts with new ¼” hex head bolts 2 ¼” in length with the nut on the inside side of the spring. You’ll also need to replace the spacers the clamp bolts pass through. The bolts were originally wrapped with either brass or steel to create a sleeve. I used a three-foot length of 3/8” brake line and cut it to length (16 pieces 1 9/16" each) with a pipe cutter to replicate the effect.
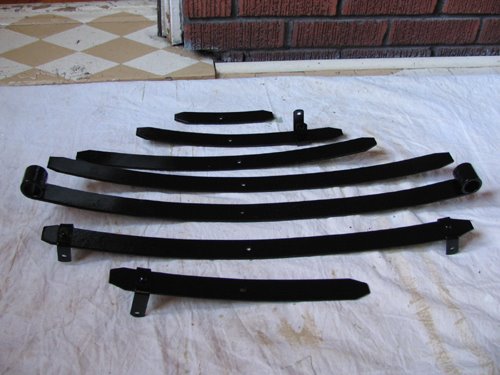
You may notice that one of the front springs has four retaining clamps facing downwards, while the other has three down and one up. The one odd clamp is to provide extra room for the steering rods to pass under the spring. This is the nearside spring. In practice, the upwards clamp is not really necessary.
Your springs are now ready to be installed on the frame. Make sure you don’t put them on backwards. The rear springs are not a problem as the center bolt (as the term suggests) is actually in the centre, but the bolt on the front springs is not. Measuring from the centre of each bushing to the bottom of the centre bolt, you’ll find one end measures 15” and the other 13”. The short end should point forward. If placed back to front, the front axle will actually be 3” further back than it should be and you'll have to do some tricky work to get the steering linkage to fit.
It’s amazing how involved even something as simple as restoring leaf springs on your Singer Nine can be, but let’s start with the obvious (starting with taking a few digital shots).
 Remove the bushings, dismantle the springs and examine for wear. This may dictate whether you want to continue. Generally you’ll find they’re in restorable condition, although one of my Nines had a couple of leafs that had worn to the point they looked like knife blades. Also take a look at the retaining clamps. You may need to peen the rivets that secure them to the leaf to tighten them up.
Clean the crud and scale off each leaf. The stiff wire brush on a grinding machine works pretty well and does a reasonably complete job. I would recommend this step even if you plan on having them glass beaded. I prefer glass beading to sand blasting, as it’s easier on the metal. It’s also much cleaner as it doesn’t leave grit in all the nooks and crannies.
Next prime each leaf with a good commercial rust proofing primer (not tremclad) and top coat with a compatible enamel. Let the topcoat cure for a week or so before any further work.
Prior to reassembling, rebush the main leaf. It’s easier to manipulate one leaf, rather than the whole assembled spring. The Silentbloc bushings are the same as the ones used in the frame, although I did find that the rear springs used a 7/8" outer diameter bushing, rather than the usual 15/16". I don't know if this was typical. Fortunately, I was able to get these at my local spring shop, although they needed to be cut to length.
Proceed with reassembly. I put mine together dry; that is, with no lubrication. The theory is that if lubricated, grit gets trapped and remains between the leaves hastening spring wear.
Replace all the spring retaining clamp bolts with new ¼” hex head
You may notice that one of the front springs has four retaining clamps facing downwards, while the other has three down and one up. The one odd clamp is to provide extra room for the steering rods to pass under the spring. This is the nearside spring. In practice, the upwards clamp is not really necessary.
Your springs are now ready to be installed on the frame. Make
 sure you don’t put them on backwards. The rear springs are not a problem as the center bolt (as the term suggests) is actually in the centre, but the bolt on the front springs is not. Measuring from the centre of each bushing to the bottom of the centre bolt, you’ll find one end measures 15” and the other 13”. The short end should point forward. If placed back to front, the front axle will actually be 3” further back than it should be and you'll have to do some tricky work to get the steering linkage to fit.
posted by Peter at 6:16 PM
1 comments
![]()

